Date Published: 2015-09-22
Four Methods For Catching Small Prey
By Adelia Ladson
 The Bottle Trap can be used for rodents.
 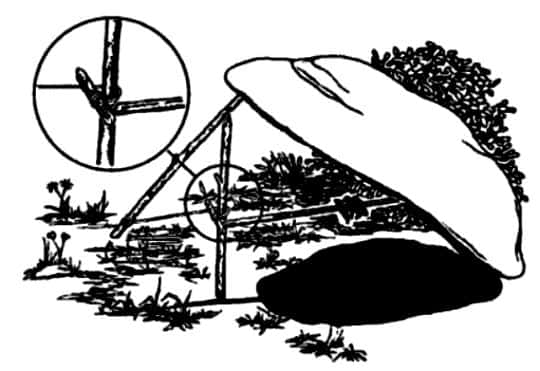 The Paiute Deadfall Trap was named after the Paiute Indians.
Shop All Field and Survival Gear Here So, you’re stranded out in the wild, you’ve chosen to live off the land or Zombies have invaded your grocery store. What do you do now? Well, you need to be able to catch your own food. And if you’re short on ammo or guns, in general, you gotta figure out how to bring home the bacon another way. Trapping or snaring small game is gonna be your best bet because even in an urban area, you can find small game to eat (squirrels).
The first thing you need to do, as always, is to take stock of what tools you have available to you. Do you have paracord or small weight wire? I won’t even ask if you have a knife because everybody should have a knife on them if they step out into the wild – suburban, urban or rural. Do you have a shovel or something you can dig with? The items that you can lay your hands on will determine the types of traps or snares you can fashion.
Now, consider your environment. What small game would be out there just waiting to get in your belly? To me, squirrels are probably the most prolific little beasts and can be found in just about any environment whether city or country. But you may have rabbits in your area and don’t discount frogs as small prey.
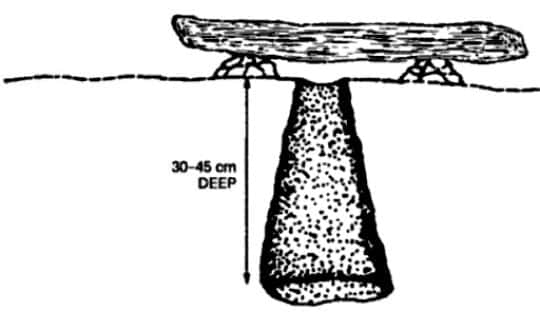
The Bottle Trap can be used for rodents.Bottle Hole Trap
A Bottle Hole Trap can be set if you have something to dig a hole with. It’ used primarily for small prey like mice and voles, which are not the most appealing dinner to me but … Dig your hole about a foot to a foot-and-a-half deep and make sure the bottom is wider than the top like a bottle. Cover the hole with a piece of bark propped up by small rocks. It needs to be high enough off the ground that the rodent will find it appealing to try and hide under. When they fall into the hole, they won’t be able to climb out because of the bottle-like shape.
Ground Snare
Snares are probably the simplest trap to make and require only thin wire or cord. The basic concept is that the animal is caught in a noose. There are several methods of constructing and setting a snare but I am going to stick to just one. Take a stick (this is the stake to hold up your snare) and sharpen one end so that it can be put into the ground. At the other end, put a notch at the top all the way around the stick so that your wire or cord will have something to catch in. If you have paracord, just pull out the guts and use one of the inside strands. Wrap your cord or wire around the top of your stick where the notch is and tie if off nice and tight or twist it off, as the case may be. Now, make your noose about a hand-length away from your stick. Use a slip know at the end of your wire so that your loop slides freely. Then, get your stake in the ground really good and take some small sticks with natural forks and poke them in the ground, using them to keep the noose open. The idea is that your intended prey will run head-first into the noose and it will slip closed around its neck.
The Paiute Deadfall Trap was named after the Paiute Indians.Paiute Deadfall Trap
The Paiute Deadfall Trap (named for the Paiute Indians) uses bait to bring in your quarry and then … SQUISH! It’s all over. Just a note: Deadfall traps are not legal in many states. The basic concept is you use a “hammer”, which can be a large rock or piece of wood, that’s balanced in place by a trigger system until it’s triggered by your prey. First, you need a Y-shaped stick that is about 8 inches long and a straight stick about 9 inches long. Both of these need to be thick enough to bear the weight of your hammer. Then, you need a stick a little bit smaller than a pencil and about 2 inches long to use as the “toggle.” You also need about 8 inches of string (paracord comes in handy again). Finally, a skinny bait stick that’s about a foot long and the bait you’ll be using are the last two items you need. (Bait will depend on what you’ve got available to you but I would try almost anything in a survival situation.) To set the deadfall trap, take the straight stick and tie one end of your string to it and the other end of the string to your toggle. Stand the Y-shaped stick up and rest the end of your straight stick (the end not tied with string) in the fork with about an inch sticking out. This is the one inch that your rock or piece of heavy wood will be resting on. Put one hand on the straight stick where the string is tied and hold it in place while you place your hammer on the one inch. You should be balancing the hammer in place just by holding the end of the stick down. Now, wrap the toggle (two-inch stick) halfway around the Y-shaped stick close to the ground. (Not too close, though.) If you’re with me so far, you should be able to now balance the hammer by just holding the toggle in place wrapped halfway around. The end of the straight stick should off the ground, essentially, held in place by the tension of the string and the toggle. Take your baited stick and carefully place the bait end up under your hammer and against it while the other end needs to be placed against the toggle, which should be perpendicular to the Y-shaped stick it is half-wrapped around. If you’re like me and less coordination than you think you do, it may take a couple of tries to set. The best thing is if you have a friend along with you to help.
Ojibwa Bird Pole
The Ojibwa Indians have used the Bird Pole for centuries as an effective way to snare birds. You will need a pole about the size of a walking stick, a thick stick about the length of a pencil and the diameter of your pinky finger with one end tapered, 3 feet of cord or snare wire, and a rock to act as a weight (not over 10 ounces). You will also need a way to drill a small hole in your walking stick sized pole. Both ends of the pole should be sharpened so that one end can be driven into the ground and the other end will keep birds from landing on it instead of your “perch.” Drill a hole through the pole a little ways down from the top of it. Your perch will need to fit loosely in it. Take your cord or wire and tie the rock to one end of it and then pass the other end through the hole that you drilled and tie an overhand knot in the enough away from the end of the cord to give yourself room to tie a noose but still close to the noose. The overhand knot should be big enough that it will act as temporary stopper when positioned against the pole on top of the perch. This is your trigger system, which is formed by the tension of the cord and the knot holding the perch balanced in place in the drilled hole. Remember you are not jamming the perch into the pole but rather precariously balancing it. Once you have it balanced, carefully spread the noose out over the perch. The idea is that the bird will land on it, the perch will fall and it will be caught in the snare by its feet.


